EXYPNOS FLUX control software
Note: Previous versions of the Exypnos Flux were branded as the Smart Pump and that branding persists in the pump control application.
Download here: Smart Pump control software
Installation
Instructions: Download the control software as an executable file. The Smart Pump control software can be run without any need to install it, just save it to your hard drive and you’re ready to go. When opening the software the first time you might encounter a message from Microsoft Defender SmartScreen explaining that it saved you from running an unrecognized app. Simply click the More Info link and then the Run Anyway button. Finally, the software will open.
Connecting to the Exypnos Flux
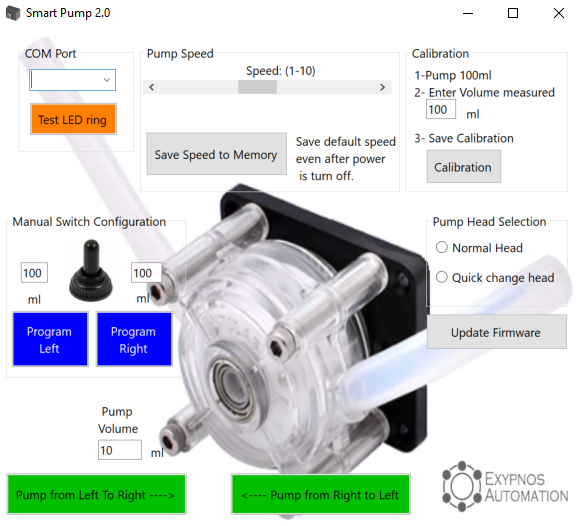
From here, you can connect to the pump (make sure the USB cable is connected). The Smart Pump control software will autodetect the COM port the Exypnos Flux is connected to and automatically display the pump configuration (pump head type, pump speed, and firmware version). You can test the connection by clicking the Test LED Ring button.
Controlling Pump Speed
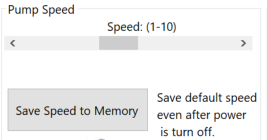
You can control the flow rate from low (1) to high (10) using the slider. By clicking the Save Speed to Memory button, the speed will be saved to the Exypnos Flux (even if turned off or unplugged) as the default pump speed.
Pumping a set volume (via software)
Enter a volume and then click the left or right button depending on how your tubing is connected. For example, if your reagent is connected to the right side of the pump and the refill reservoir is connected to the left side of the pump, then clicking the Pump from Right to Left button will move liquid from your bottle to the reservoir.
Note: until you calibrate your Exypnos Flux unit, the volumes will be close, but may not be exact.
Pumping a set volume (via manual control)
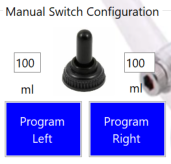
Enter a volume that will be pumped when the switch is toggled left or right (v1 and v2 pumps) or when the red and green buttons are pressed (Exypnos Flux). For example, if you have the pump configured to pump left to fill the reservoir and you want to wash the tubing extensively then you might set Program Left to 100-200 mls. For emptying the tubing, you would set the appropriate volume for Program Right. This allows these custom volumes to be pumped with the convenience of the manual switch/buttons on the pump.
Calibration
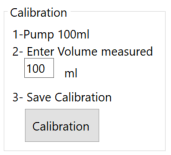
Connect a bottle of water to one side of the pump and route the tubing on the other side to an empty bottle. Run the pump until water reaches the empty bottle. Discard any liquid and weigh the empty bottle. Now pump 100 ml into the bottle and weigh the bottle again. Using 1 g = 1 ml, determine the number of milliliters pumped or use a graduated cylinder to measure the volume directly. For best results, repeat 2 more times and enter the average into the box in Calibration section of the software. Click the Calibration button and your Exypnos Flux is now calibrated!

Exypnos Flux Operation via Command Line
Your Exypnos Flux can be operated without opening the application. This is particularly useful when controlling the Exypnos Flux from the your liquid handler software. The syntax is:
Smartpump.exe [COM port#] [Argument1] [Argument2]
For example: C:\temp\SmartPump\smartpump.exe 4 speed5 LR20 would cause the PC to connect to the Exypnos Flux on COM 4, set the speed to 5 and pump 20 ml left to right. If the speed is not included, it will use the last speed setting used. For instance, C:\temp\SmartPump\smartpump.exe 4 LR50 would cause the pump to move 50 mls left to right at the last speed used.
Exypnos Automation Operation via Dynamic Devices Method Manager 4
In Method Manager 4, add Run Exe to your liquid handling method. Double-click on the step and fill it in with the appropriate path to where you saved SmartPump.exe and add the arguments as shown in the example.
Note: when controlling the Smart Pump through the command line or Method Manager 4, you must close the Smart Pump Control Software first. The Exypnos Flux does not support multiple, concurrent connections.